Lip tint looks best when the color is smooth, balanced, and easy to control. For people in the United States, the main challenge is often dry lips caused by cold winters, indoor heat, air conditioning, or long-wear formulas that set quickly.
To apply lip tint evenly, start with clean, lightly moisturized lips. Remove extra balm, apply a thin layer of tint from the center outward, soften the edges, and build color slowly. A lip brush or clean fingertip can help you control the shape and prevent dark spots.
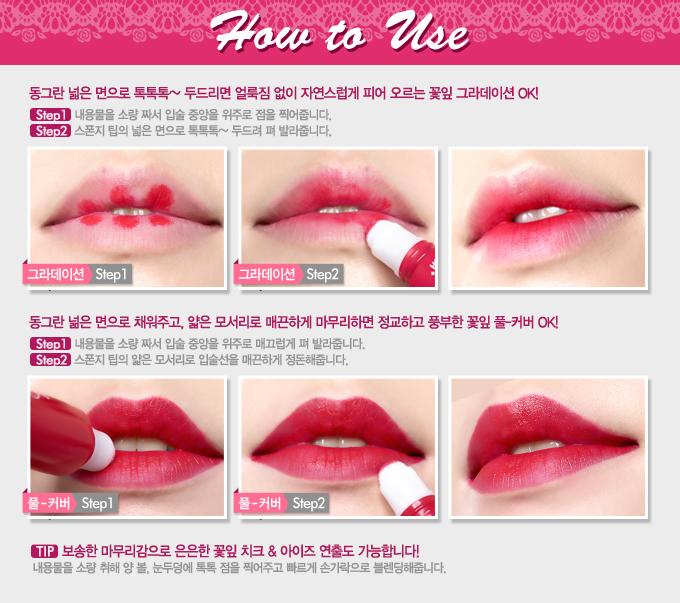
Quick Answer: How Do You Apply Lip Tint Evenly?
Follow these steps:
- Exfoliate only if your lips have loose, flaky skin.
- Apply a small amount of lip balm.
- Wait a few minutes, then blot away the excess.
- Add tiny dots of lip tint to the center of your upper and lower lips.
- Spread the color outward with a lip brush, fingertip, or the applicator.
- Add a second thin layer if you want more color.
- Check the corners, inner lip, and lip line for uneven areas.
- Clean the edges with a cotton swab and a little makeup remover.
The key is to use thin layers. A large amount of tint can dry before you have time to blend it.

What Is Lip Tint?
Lip tint is a lip color that leaves a stain or wash of color on the lips. Unlike many traditional lipsticks, it often feels lighter and may remain visible after some of the surface product wears away.
Lip tints come in several forms:
- Water-based tints: Often feel light and spread quickly.
- Gel tints: Usually give more slip and blend time.
- Cream tints: May feel more like a lipstick or lip stain.
- Oil-based tints: Can feel smooth but may apply less evenly on very dry lips.
- Peel-off tints: Form a film that you remove after it dries.
Each type behaves differently. A fast-drying water tint needs quick blending. A cream tint may give you more time to shape the edges.
A lip tint does not always hide dry patches. Instead, pigment may collect around flakes and make them stand out. That is why lip preparation affects the final result as much as the product itself.

What You Need Before Applying Lip Tint
You do not need many tools. Gather:
- Lip balm or a plain moisturizing lip product
- A clean tissue
- Lip tint
- A small lip brush or clean fingertip
- A cotton swab
- Makeup remover or micellar water
- Optional lip liner in a close color
Choose a well-lit mirror. Natural light can help, but a bright indoor light also works. Good lighting makes it easier to see missed spots near the corners and the center of the lower lip.
If you are using a new lip product, read the label and follow its directions. Do not share lip products. Sharing can spread germs, especially when the product touches the mouth.
Avoid applying tint over cracked, bleeding, swollen, or painful lips. A cosmetic product may sting and can make irritation worse.

How to Apply Lip Tint Evenly Step by Step
1. Start with clean lips
remove old lipstick, gloss, food, and excess oil. Use a damp cotton pad or a gentle makeup remover.
Pat your lips dry. Do not rub hard. Strong rubbing can leave the skin red and make the tint look uneven.
2. Smooth loose flakes carefully
If your lips have loose flakes, use a damp washcloth with very light pressure. You can also use a lip exfoliant made for the lips, but avoid harsh scrubbing.
Do not exfoliate lips that are cracked, sore, or bleeding. In that case, focus on gentle moisture and wait until the skin feels comfortable.
3. Apply a thin layer of balm
Use a small amount of plain lip balm. Let it sit for two to five minutes.
The goal is to soften the lips, not leave a thick, slippery layer. Too much balm can dilute the tint or cause it to slide toward the lip line.
Blot the excess with tissue before applying color. Your lips should feel smooth but not greasy.
4. Apply the first layer at the center
Place a small dot of tint in the middle of the lower lip. Add another small dot to the center of the upper lip.
The center usually needs the most color because natural lip color is often deeper there. Starting in the middle also gives you more control than drawing a full outline at once.
For a soft look, keep the color mainly in the center. For full coverage, spread it toward the outer edges.
5. Blend outward in short strokes
Use the applicator, a lip brush, or a clean fingertip to move the tint from the center toward the corners.
Use short, light strokes. Avoid rubbing back and forth for too long, since some tints begin to set quickly.
Blend along the upper lip first, then the lower lip. Look for a smooth change from the strongest color at the center to lighter color near the edges.
6. Fill the corners and lip line
The corners can look pale if you stop blending too soon. Open your mouth slightly and apply a very small amount to each corner.
Trace the natural lip line with the remaining product on your brush or applicator. Do not add a thick line unless you want a more defined look.
If the tint has already dried, do not keep scrubbing the area. Add a tiny amount of balm or a second small dot of tint to soften the patch.
7. Add color in thin layers
Wait briefly to see the true color. Some tints deepen as they dry.
If you want stronger color, add another thin layer. Apply it only where the color looks weak rather than covering the whole mouth with a large amount.
Two thin layers often look more even than one heavy layer. This also makes it easier to correct a mistake.
8. Check the inner lip
Smile, talk, and open your mouth slightly. Look at the inner edge of the lips.
Some formulas collect in the inner lip or wear away quickly there. If needed, blend a very small amount across the inner edge, then press your lips together once.
Do not press your lips together repeatedly while the tint is setting. Repeated movement can create a darker band in the center.
9. Clean the outer edges
Use a clean cotton swab to remove color outside your natural lip line. For a sharper edge, add a small amount of makeup remover to the swab.
Avoid wiping across the whole lip. This can remove the stain unevenly.
For a soft finish, use a clean fingertip to tap the edge instead of removing it completely. This creates a blurred effect.

How to Make Lip Tint Look More Even on Dry Lips
Dry lips need moisture, but too much oil can interfere with tint. Use this balance:
- Apply a light layer of balm.
- Wait several minutes.
- Blot well.
- Apply the tint in small sections.
- Add balm again only after the tint sets.
If your lips are very dry, a moisturizing lip mask used before makeup may help. Remove the mask fully before adding tint.
Avoid peeling skin with your fingers. This can create small cuts that make pigment sting and gather in uneven spots.
A creamy tint may work better than a fast-drying water tint when your lips are dry. The trade-off is that creamy formulas may transfer more easily.

How Much Lip Tint Should You Use?
The right amount depends on the formula and the look you want.
| Desired look | Starting amount | Best method |
|---|---|---|
| Sheer stain | 1–2 small dots per lip | Blend from the center outward |
| Medium color | 2–4 small dots total | Add one thin second layer |
| Full color | Several thin layers | Let each layer settle before adding more |
| Blurred lip | Small amount on the center | Tap the edges with a fingertip |
| Defined lip | Thin layer across the full lip | Clean the outer line with a cotton swab |
These amounts are starting points, not fixed rules. A highly pigmented tint may need only one small dot. A sheer tint may need more product.
The deciding factor is how quickly the formula dries. If it dries fast, work in small sections. If it stays wet longer, you can spread it across the lips before it sets.

Lip Brush, Finger, or Applicator: Which Works Best?
Each method offers a different level of control.
Lip brush
A lip brush is useful for:
- A defined lip shape
- Blending near the corners
- Applying color in thin layers
- Working with highly pigmented tint
Use a clean brush each time. Product left on the bristles can dry and create streaks.
Clean fingertip
A fingertip works well for:
- A soft, blurred effect
- Fast application
- Blending the edges
- Sheer color
Wash your hands first. Tap instead of rubbing when the tint has started to set.
Built-in applicator
The included applicator is convenient and often works well for a full lip. Use the tip for the corners and the flat side for larger areas.
Remove extra product from the applicator before touching your lips. This simple step helps prevent dark marks.

Common Lip Tint Problems and How to Fix Them
The tint looks darker in some areas
Likely cause: Too much product collected in one spot, or the lips had dry flakes.
Fix: Soften the area with a small amount of balm. Blot gently, then blend the edge with a clean fingertip or brush.
The lip line looks patchy
Likely cause: The outer lip was dry or the product dried before it was spread.
Fix: Use a small brush with a trace of balm or a matching cream product. Tap along the edge instead of dragging across it.
The tint bleeds outside the lips
Likely cause: Too much balm, too much product, or a formula that stays wet.
Fix: Blot the lips and clean the outer edge with a cotton swab. A matching lip liner can help define the border, especially with a glossy or fluid tint.
The tint disappears from the center
Likely cause: Food, drinks, saliva, or repeated lip pressing removed the product.
Fix: Pat the lips dry and add a small amount to the center. Avoid applying a thick coat over moisture.
The color looks too strong
Likely cause: The formula is highly pigmented or too many layers were used.
Fix: Press a tissue lightly over the lips. Then tap on a small amount of balm to soften the stain. If needed, use a gentle makeup remover designed for the product.
The upper and lower lips do not match
Likely cause: One lip received more product or has a different natural color.
Fix: Compare the lips in a mirror. Add tiny dots only to the lighter area, then blend both lips together.

Common Mistakes to Avoid
Applying tint over thick balm
A heavy balm layer can make tint slide, separate, or fade in spots. Use less balm and blot before applying color.
Drawing the full lip outline first
Some tints dry too quickly for this method. The outline may look darker than the center. Start in the middle and move outward instead.
Using one large swipe
A large swipe can deposit too much product. Small dots give you more control and make correction easier.
Rubbing after the tint dries
Hard rubbing can create a patchy stain. Rehydrate the area with a little balm before blending.
Ignoring the corners
The corners are easy to miss. Check them with your mouth slightly open, then add only the smallest amount needed.
Layering without waiting
Some tints deepen as they dry. Adding several layers too soon may create a darker result than you expected.
Applying a face exfoliant to the lips
Many face exfoliants are not designed for the delicate skin of the lips. Use a lip-safe product or skip exfoliation when the skin is irritated.

Lip Tint Safety and Product Care
Lip products are cosmetics, but they still need careful use.
The U.S. Food and Drug Administration advises consumers to stop using a cosmetic if it causes an unwanted reaction. Seek medical care for severe swelling, trouble breathing, or other serious symptoms.
Keep these habits:
- Do not share lip tint.
- Keep the applicator clean and closed.
- Do not add water or other liquids to the product.
- Avoid using a product that has changed in smell, color, or texture.
- Follow the package instructions and any period-after-opening symbol.
- Stop using the product if you develop burning, swelling, rash, or persistent irritation.
- Avoid applying tint to broken or infected skin.
If you have a known allergy to fragrance, flavor, dyes, or preservatives, check the ingredient list. If you are unsure which ingredient causes a reaction, a dermatologist or other qualified health professional can help with evaluation.

Key Takeaways
- Begin with clean, smooth lips.
- Use a small amount of balm, then blot it.
- Start at the center and blend toward the edges.
- Apply thin layers instead of one heavy coat.
- Use a lip brush for control and a fingertip for a soft finish.
- Check the corners and inner lip before the tint sets.
- Fix patchiness with moisture and gentle tapping, not hard rubbing.
- Stop using the product if it causes irritation.
FAQs About Applying Lip Tint Evenly
Should I apply lip liner before or after lip tint?
Apply lip liner before tint when you want a clear shape or need help preventing feathering. Choose a liner close to your natural lip color or the tint shade. For a blurred look, apply tint first and soften the edges before using little or no liner.
Can I wear lip balm under lip tint?
Yes. Use a thin layer and let it absorb for a few minutes. Blot away the excess before applying tint. A thick, oily layer can make the color slide or apply unevenly.
Why does lip tint look patchy on my lips?
Dry flakes, uneven moisture, excess balm, and fast-drying formulas can all cause patchiness. Start with clean lips, use light moisture, blot well, and apply the tint in small sections.
How do I make lip tint last longer?
Apply it to clean, dry lips after blotting away excess balm. Build the color with thin layers and allow each layer to settle. Keep in mind that eating, drinking, and rubbing the lips will still reduce wear.
Is lip tint safe for chapped lips?
It is better to avoid tint on cracked, bleeding, or painful lips. The product may sting and can make the area look more uneven. Let the lips recover with gentle care before applying color.
How can I remove a lip tint stain?
Use a gentle makeup remover or an oil-based cleanser that is suitable for the lips. Press the product onto the lips for a short time, then wipe gently. Avoid harsh scrubbing.
Conclusion
The easiest way to apply lip tint evenly is to control the amount and give yourself time to blend. Start with lightly moisturized lips, use small dots of color, and move from the center toward the edges. Add more only where needed.
If the tint turns patchy, do not scrub. Soften the area with a little balm, tap the color into place, and clean the outer edge with a cotton swab. With this method, even a strong lip stain can look smooth, balanced, and natural.
Next step: Try the center-out method with one thin layer in good light, then adjust the color after it sets.