The easiest eyebrow pencil to use is usually a retractable pencil with a fine, angled or oval tip and a built-in spoolie brush. It should have a medium, buildable formula. This lets you draw small hair-like marks, fill sparse areas, and soften the color before it looks too strong.
For most people in the United States, a fine-tip brow pencil is easier to control than a soft, thick crayon. The best choice still depends on your brow type, makeup skill, skin type, and the finish you want.
Introduction
Eyebrow pencils can look simple, but the wrong shape or formula can make brows look dark, flat, or uneven. A pencil that works well for one person may feel hard to control for another.
This guide is for people shopping for eyebrow makeup in the U.S. It explains which pencil features make application easier, how to choose a shade, and how to apply the product without harsh lines. It also covers common problems, cleaning, eye-area safety, and useful alternatives.
The advice below is based on standard brow makeup design, product instructions, and U.S. cosmetic safety guidance. It is not a hands-on product test, so no product is presented as the universal “best.”

The Easiest Eyebrow Pencil: What to Look For
The easiest eyebrow pencil has four key features:
- A fine or slim tip
- A medium-firm texture
- A buildable color
- A spoolie brush
A fine tip gives you control. You can make short strokes that look more like brow hairs. A very thick tip may fill brows quickly, but it can be harder to use near the inner brow or under the arch.
A medium-firm formula is also easier for beginners. A pencil that is too soft may release too much color at once. A pencil that is too hard may drag the skin or leave a weak mark.
Buildable color gives you room to correct mistakes. You can add more product as needed. This is safer than starting with a very dark line.
A spoolie helps spread the pigment through the brow hairs. It also softens the front of the brow, where heavy color can look less natural.
Best pencil shapes for beginners
| Pencil shape | Best for | Main benefit | Main drawback |
|---|---|---|---|
| Fine micro tip | Sparse brows and hair strokes | High control | Takes more time |
| Slim oval tip | Most beginners | Easy balance of detail and fill | Less precise than a micro tip |
| Angled flat tip | Fast filling | Covers more space | Can look blocky with heavy pressure |
| Thick crayon tip | Very full brows | Quick application | Harder to create fine strokes |
| Powder-style pencil | Soft, gentle makeup | Blends with less effort | May not define gaps as well |
For most users, a slim oval tip is the easiest starting point. Choose a micro tip if you have very sparse brows or want a hair-stroke effect.
Retractable or Sharpenable: Which Is Easier?
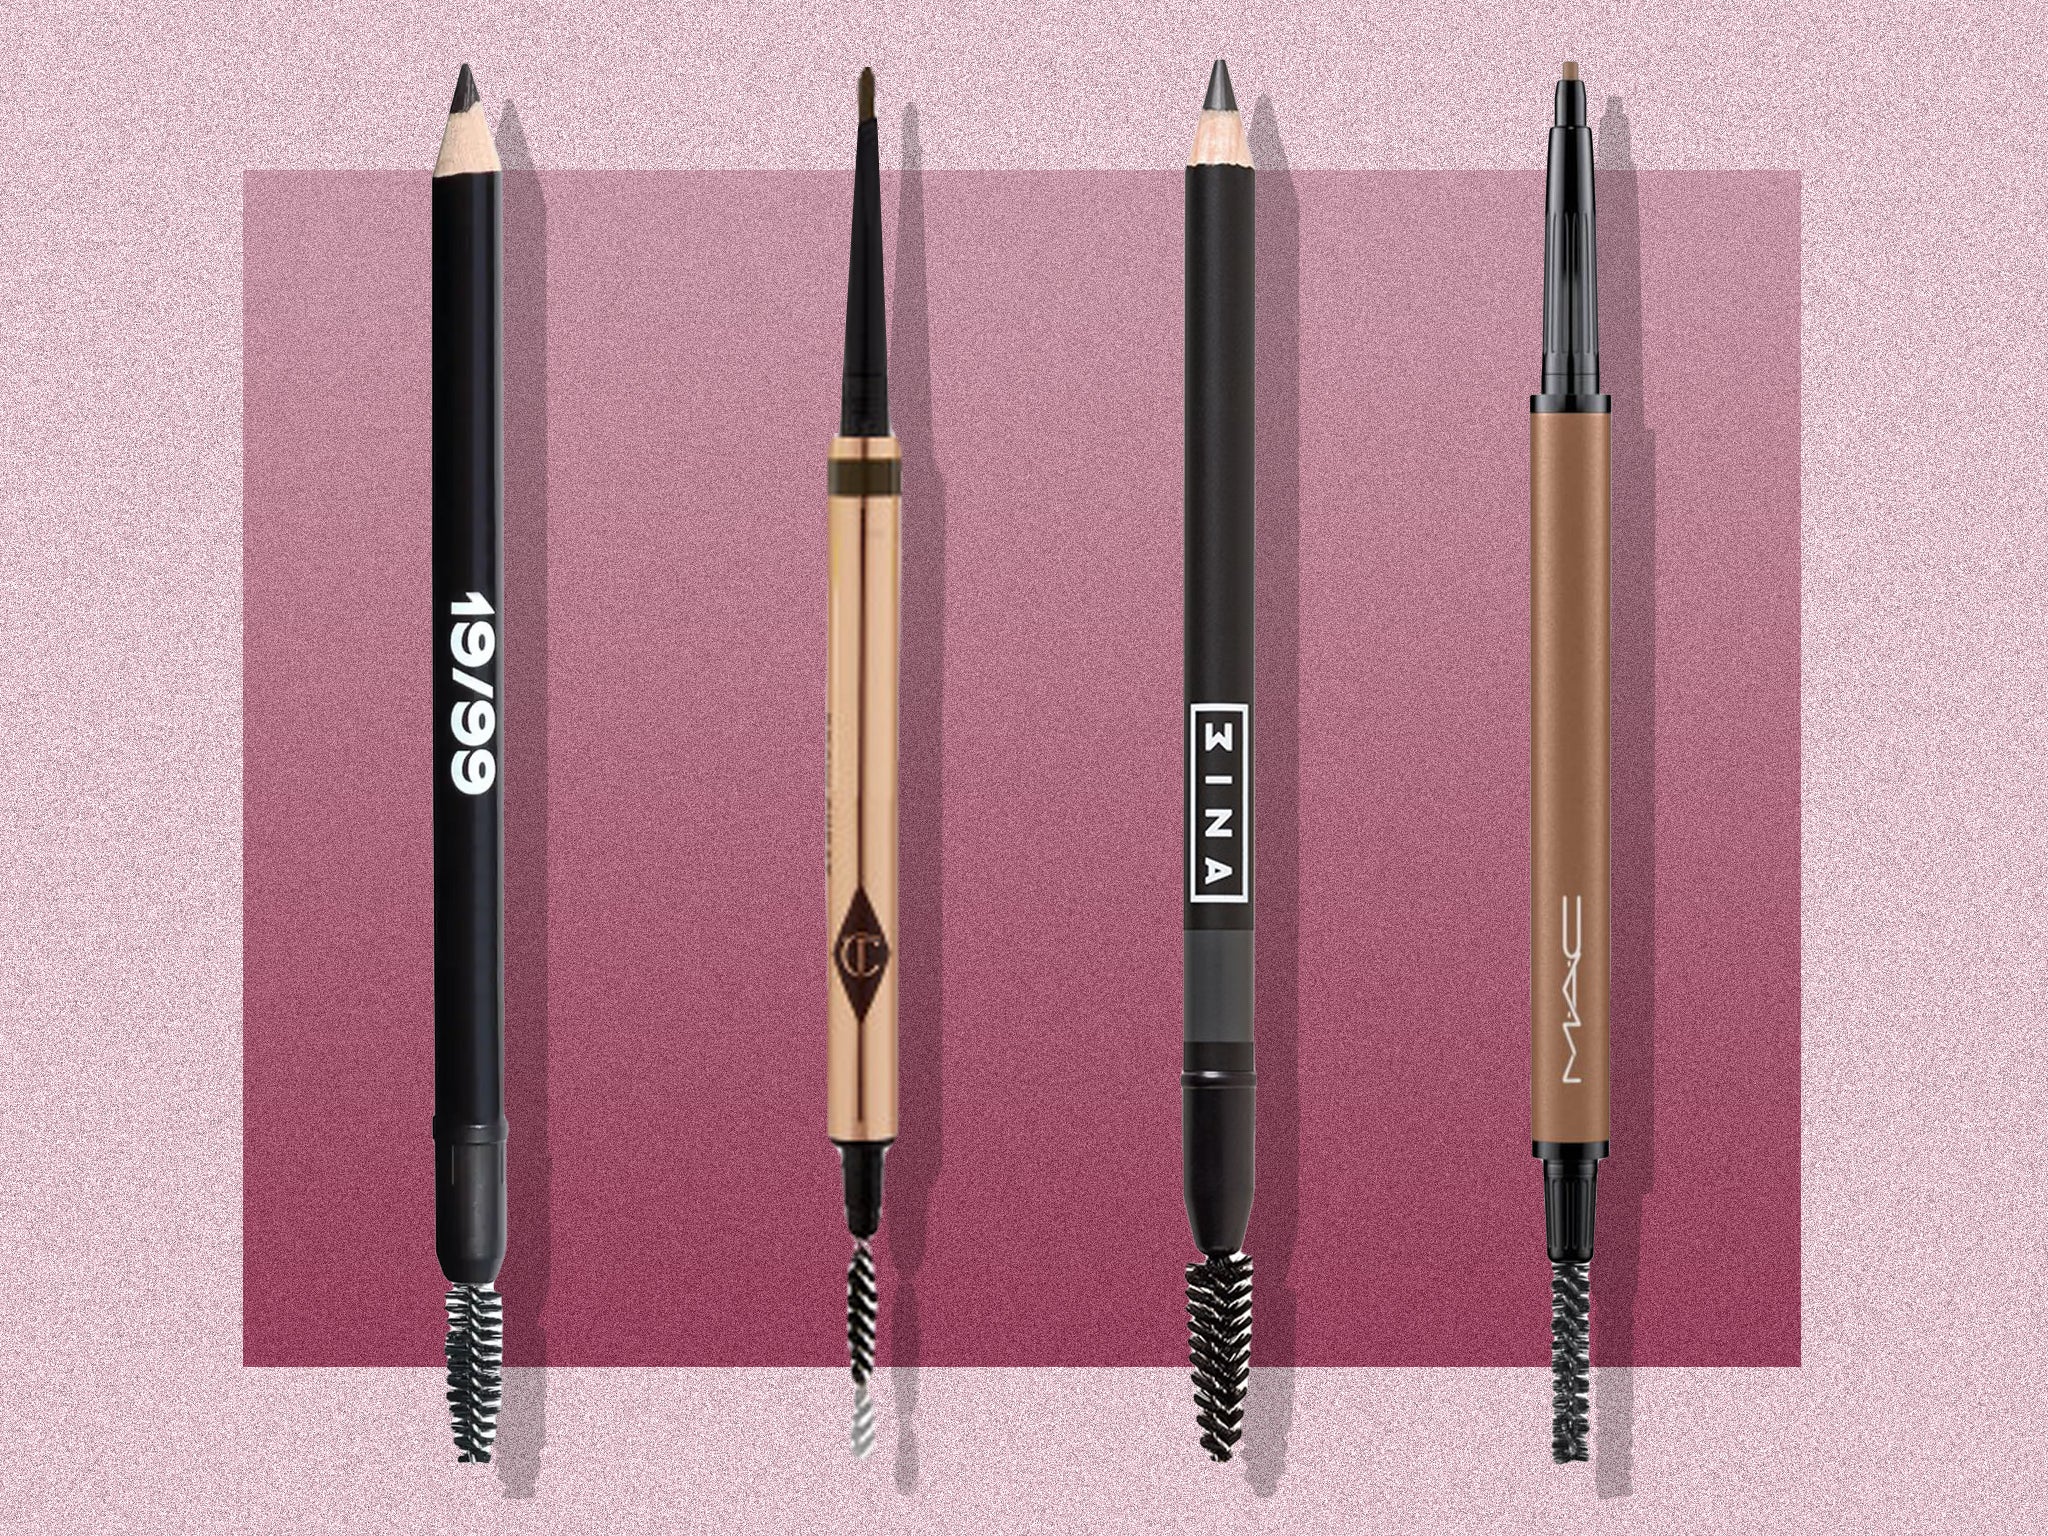
A retractable brow pencil is usually easier for daily use because it needs no sharpener. The tip stays small, and the product is ready to use. Many retractable pencils also include a spoolie.
A sharpenable pencil can offer a fresh, sharp point. This may help with fine lines. However, you need a cosmetic sharpener, and the pencil can become too soft or blunt if stored in a warm place.
Choose a retractable pencil if you want:
- Fast application
- Less mess
- Easy travel
- A consistent tip
- A simple beginner routine
Choose a sharpenable pencil if you want:
- A very sharp point
- More control over tip shape
- A traditional pencil texture
- The ability to sharpen away the used surface
Do not use a regular office pencil sharpener on brow makeup. It may damage the pencil or introduce dirt near the eye area.

Which Eyebrow Pencil Is Best for Beginners?
A beginner should look for a retractable, slim, medium-firm pencil in a soft natural shade. A built-in spoolie is strongly useful because it lets you blend as you work.
The easiest beginner format is often:
- Brush the brows.
- Mark the lower edge lightly.
- Add short strokes to sparse areas.
- Brush through again.
- Stop before the color looks solid.
Avoid starting with a very dark pencil. A lighter shade is easier to build and easier to fix.
Choose the tip based on your goal
- You want natural hair strokes: Choose a fine micro tip.
- You want to fill small gaps: Choose a slim oval tip.
- You want fast definition: Choose an angled tip.
- You want a soft, blurred brow: Choose a powder-style pencil.
- You have thick brows: Choose a firm, fine pencil rather than a thick crayon.
- You have mature or delicate skin: Choose a smooth pencil that does not require much pressure.
The easiest pencil is not always the fastest pencil. A thick crayon may fill a brow in fewer strokes, but a fine pencil may give better control and require less correction.
How to Choose the Right Brow Pencil Shade
The right shade often matters more than the brand. A good pencil should add shape without making the brows look painted on.
As a general guide:
- Blonde hair: Try taupe or light brown.
- Light brown hair: Try soft brown or neutral brown.
- Medium brown hair: Try medium brown or neutral dark brown.
- Dark brown hair: Try deep brown rather than automatic black.
- Black hair: A deep brown or soft black may look more natural than a harsh black.
- Red or auburn hair: Try warm brown, auburn, or a muted reddish brown.
- Gray or silver hair: Taupe or cool gray-brown can work well.
Hair color is only a starting point. Skin tone, brow hair color, and personal style also affect the result.
If you are unsure, choose a shade that looks slightly lighter and less intense than your brow hair. You can add more color. Removing a very dark mark is harder.
Warm, cool, and neutral brow shades
A warm shade has golden, red, or orange tones. A cool shade has gray or ash tones. A neutral shade sits between the two.
Warm shades may suit warm hair and skin. Cool shades may look better with ash-brown, dark blonde, or black hair. Neutral shades are often the safest choice when you are unsure.
Test the shade in natural daylight when possible. Store lighting can change how brown, gray, or red the pencil appears.

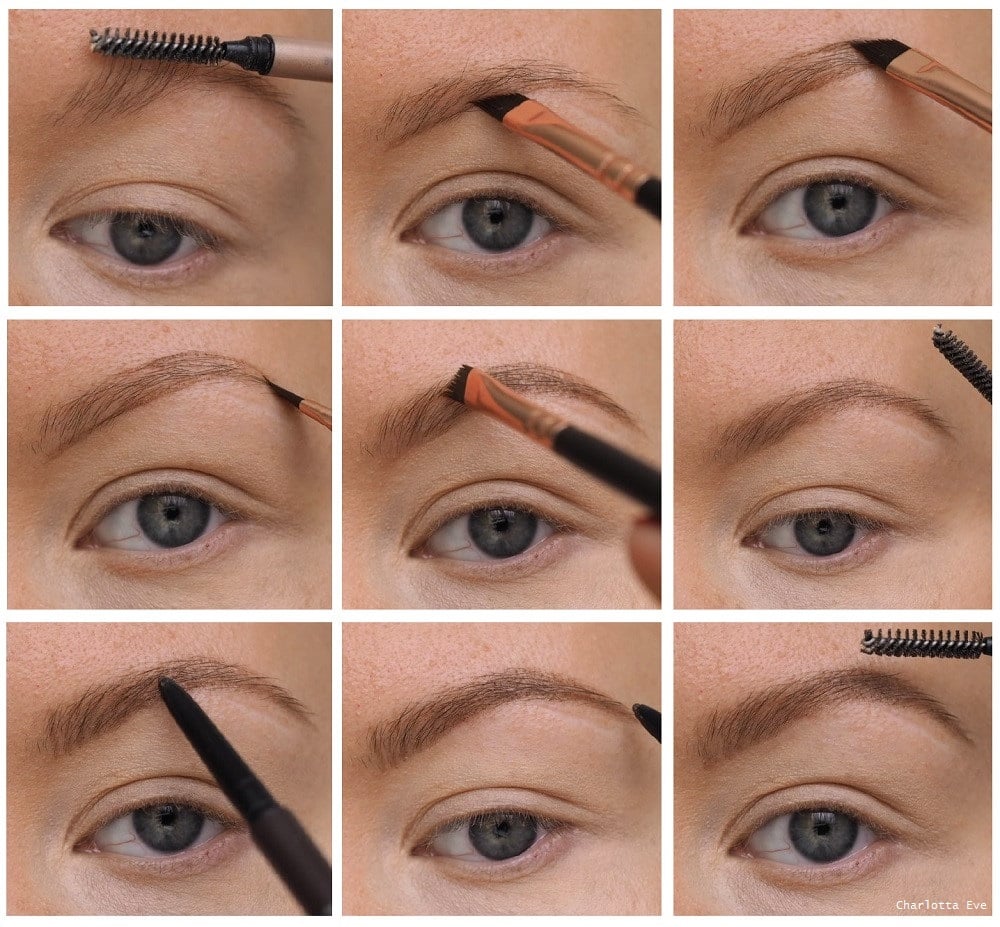
How to Apply an Eyebrow Pencil Easily
Use this simple method for a natural result.
1. Start with clean, dry brows
Remove oil, moisturizer, and makeup from the brow area. An oily surface can make the pencil slide or fade.
If you use foundation, apply it around the brows first. Then brush away any excess product from the brow hairs.
2. Brush the hairs into place
Use the spoolie to brush the brow hairs upward and outward. This shows where the natural gaps are.
Do not press hard. The goal is to arrange the hairs, not flatten them.
3. Find the main brow points
You do not need exact measurements. Look for three areas:
- The front, near the inner corner of the eye
- The arch, where the brow naturally rises
- The tail, where the brow ends
Your natural brow shape is a useful guide. Avoid drawing a completely new shape far outside the existing brow unless you want a more dramatic look.
4. Add short strokes to sparse areas
Hold the pencil lightly. Use short, quick strokes that follow the direction of the nearby hairs.
Use upward strokes near the front. Move more outward near the middle and tail. Keep the front lighter than the arch and tail.
5. Define the lower edge only where needed
A light line under the brow can add shape. Do not draw a dark line from the front to the tail in one pass.
Instead, use small strokes. Then brush over the line to soften it.
6. Brush through the color
Use the spoolie again. Brush from the front toward the tail.
This step spreads the pigment and removes excess color. It also helps join the pencil with your natural brow hairs.
7. Add more only if needed
Check both brows from a short distance. Add small amounts rather than pressing harder.
Signs of a good result include:
- You can still see individual brow hairs.
- The front of the brow is not a solid block.
- Both brows look balanced, but not perfectly identical.
- The color stays within the natural brow area.
- The brow shape still looks natural when your face is relaxed.
Why Your Eyebrow Pencil May Look Too Dark or Harsh
A brow pencil may look harsh for several reasons:
- The shade is too dark.
- The formula is too soft.
- You used too much pressure.
- You drew one long line instead of small strokes.
- You skipped the spoolie step.
- Your skin or brow hairs had too much oil.
- You made the front of the brow as dark as the tail.
The fastest fix is to brush through the brow with a clean spoolie. If the color remains too strong, use a cotton swab to lift the excess gently.
Do not add concealer over a large mistake right away. It can create a pale outline around the brow. Remove the extra pigment first, then clean the edges with a small amount of concealer if needed.
If the pencil does not show
A weak result may come from a hard formula, dry skin, leftover powder, or a shade that is too light.
Try brushing the brow hairs first. Apply with a few light passes instead of one heavy pass. If the skin is flaky or irritated, pause makeup use and address the skin concern rather than rubbing harder.
If the pencil smudges
Oil and moisture can cause smudging. Blot the brow area before application. Use less skin care under the brow, and apply thin layers.
A brow gel can help hold hairs in place, but it does not always prevent pencil transfer. Let each product set before adding another layer.
Brow Pencil Versus Other Eyebrow Products
The easiest product depends on the look you want and how much control you need.
| Product | Easiest for | Control | Finish |
|---|---|---|---|
| Brow pencil | Most beginners | High | Defined or natural |
| Brow powder | Soft fill | Medium | Soft and diffused |
| Brow gel | Holding hairs | Low for shaping | Tinted or clear |
| Brow pen | Fine hair strokes | High, but less forgiving | More defined |
| Brow pomade | Bold shaping | High for skilled users | Strong and sculpted |
| Brow wax | Hold and texture | Low alone | Structured |
A pencil is often the best first product because it combines shape, fill, and control. Brow gel may be easier if your brows are already full and only need color or hold.
A brow pen can create realistic strokes, but it often dries quickly. That makes it harder to blend if you apply too much.
Pomade can work well for a bold look, but it usually requires a brush and more practice. It is not the easiest option for most beginners.

Common Mistakes to Avoid
Avoid these mistakes when learning how to use an eyebrow pencil:
Using a black pencil by default
Black can make the brow look severe, even when the brow hair is black. Try deep brown or soft black first.
Pressing too hard
Pressure creates a thick, dark mark. A light hand gives you more control.
Drawing the front too square
The inner brow should usually look softer than the arch and tail. Use less product at the front and brush upward.
Making both brows exactly the same
Brows are naturally different. Aim for balance, not perfect symmetry.
Extending the tail too far
A long tail can pull the face downward. Follow the general direction of your natural brow.
Sharpening with the wrong tool
Use a clean cosmetic sharpener made for makeup pencils. Replace it if it becomes dirty or difficult to clean.
Applying over irritated skin
Do not use brow makeup on skin that is swollen, painful, broken, or infected. Makeup can increase irritation and may spread germs.

Eye-Area Safety and Pencil Care
Eyebrow pencils are used close to the eyes, so basic hygiene matters. Do not share your pencil or spoolie. Keep the cap closed, and avoid placing the tip on unclean surfaces.
The U.S. Food and Drug Administration advises consumers to avoid sharing eye cosmetics and to stop using eye makeup if an eye infection develops. Follow the product label for storage and replacement guidance.
Replace a pencil if:
- The smell changes.
- The texture changes.
- The tip becomes dirty or contaminated.
- The product causes repeated burning, redness, or itching.
- You used it during an eye infection.
If irritation occurs, remove the product. Seek medical advice if symptoms are severe, continue, or affect your vision.
A pencil labeled “waterproof” is not automatically easier or safer. It may last longer, but it can take more work to remove. Use a gentle makeup remover and avoid rubbing the eye area.

Quick Decision Guide
Choose based on your main need:
- Easiest overall: Retractable, slim oval pencil with a spoolie.
- Best for sparse brows: Fine micro-tip pencil.
- Best for thick brows: Firm, slim pencil with buildable color.
- Best for a soft look: Powder-style pencil or brow powder.
- Best for quick filling: Angled pencil.
- Best for oily skin: A firm, less creamy formula used in thin layers.
- Best for dry or delicate skin: A smooth formula that glides without pressure.
- Best for beginners: A shade slightly lighter than your natural brow hair.
A small pencil is not automatically better. The key is the combination of tip shape, formula, color, and spoolie.
Key Takeaways
- The easiest eyebrow pencil is usually retractable, slim, medium-firm, and buildable.
- A built-in spoolie makes blending much easier.
- Fine tips offer control; thicker tips fill faster.
- Choose a shade that is not too dark or too warm for your brow hair.
- Use short strokes and light pressure.
- Keep the front of the brow soft.
- Brush through the color before deciding whether you need more.
- Do not share eye-area makeup or use it on irritated skin.
FAQs
Is a pencil or powder easier for beginners?
A pencil is usually easier for beginners who need to create shape or fill small gaps. Powder may be easier if you want a very soft, blurred look and already have a clear brow shape.
Should an eyebrow pencil be darker or lighter than your hair?
Start with a shade that is close to your brow hair or slightly lighter. A lighter shade is easier to build and less likely to look harsh.
Are retractable eyebrow pencils better?
Retractable pencils are often more convenient because they need no sharpener. They are not automatically better in color or wear. The tip and formula matter more than the mechanism.
How do I stop my eyebrow pencil from smudging?
Apply it to clean, dry skin, use thin layers, and brush through the color. If your skin is oily, avoid applying heavy moisturizer directly under the brows before makeup.
Can I use an eyebrow pencil every day?
Many people use brow pencils daily without trouble. Stop using the product if it causes irritation, and follow the label for storage and use. Do not share it with others.
What is easier to use: a brow pencil or brow pen?
A pencil is usually more forgiving because it can be blended with a spoolie. A brow pen can make fine strokes, but it may dry quickly and be harder to correct.
Conclusion
For most people, the easiest eyebrow pencil to use is a retractable, fine or slim oval pencil with a medium-firm, buildable formula and a spoolie. Choose a soft natural shade, apply short strokes, and blend as you go.
If you are buying your first one, prioritize control over speed. A pencil that lets you add color slowly will help you create better brows with fewer mistakes.